This is a tutorial about setting up a penetration testing lab on a cloud server. More generally it’s a guide about using headless VirtualBox to offload some work to the cloud.
VirtualBox is just one of the many choices, usually I prefer to use Qemu-KVM with libvirt for management.
THIS IS A QUICK AND DIRTY METHOD, NOT SECURE
Motivations
My daily driver is a i5 Macbook Pro with 8GB of RAM, which works well for most dev and light hacking purposes. But the poor laptop starts to strain when I have to run a VM or two, to test an exploit on a specific distro, or running Boot2Root boxes for example.
So I started looking for alternatives.
- I could build a homelab and install a type 1 hypervisor like ESXi or Xenserver on it. But I don’t really have the space at my place for this at the moment.
- Continue using my laptop. But the performance strain is making the thermals go crazy, so I don’t think that would do anything to help my laptop’s lifespan.
- Rent an on-demand cloud server. Might cost more in the long run, but should be pretty cheap for what I need.
Create and connect to a droplet
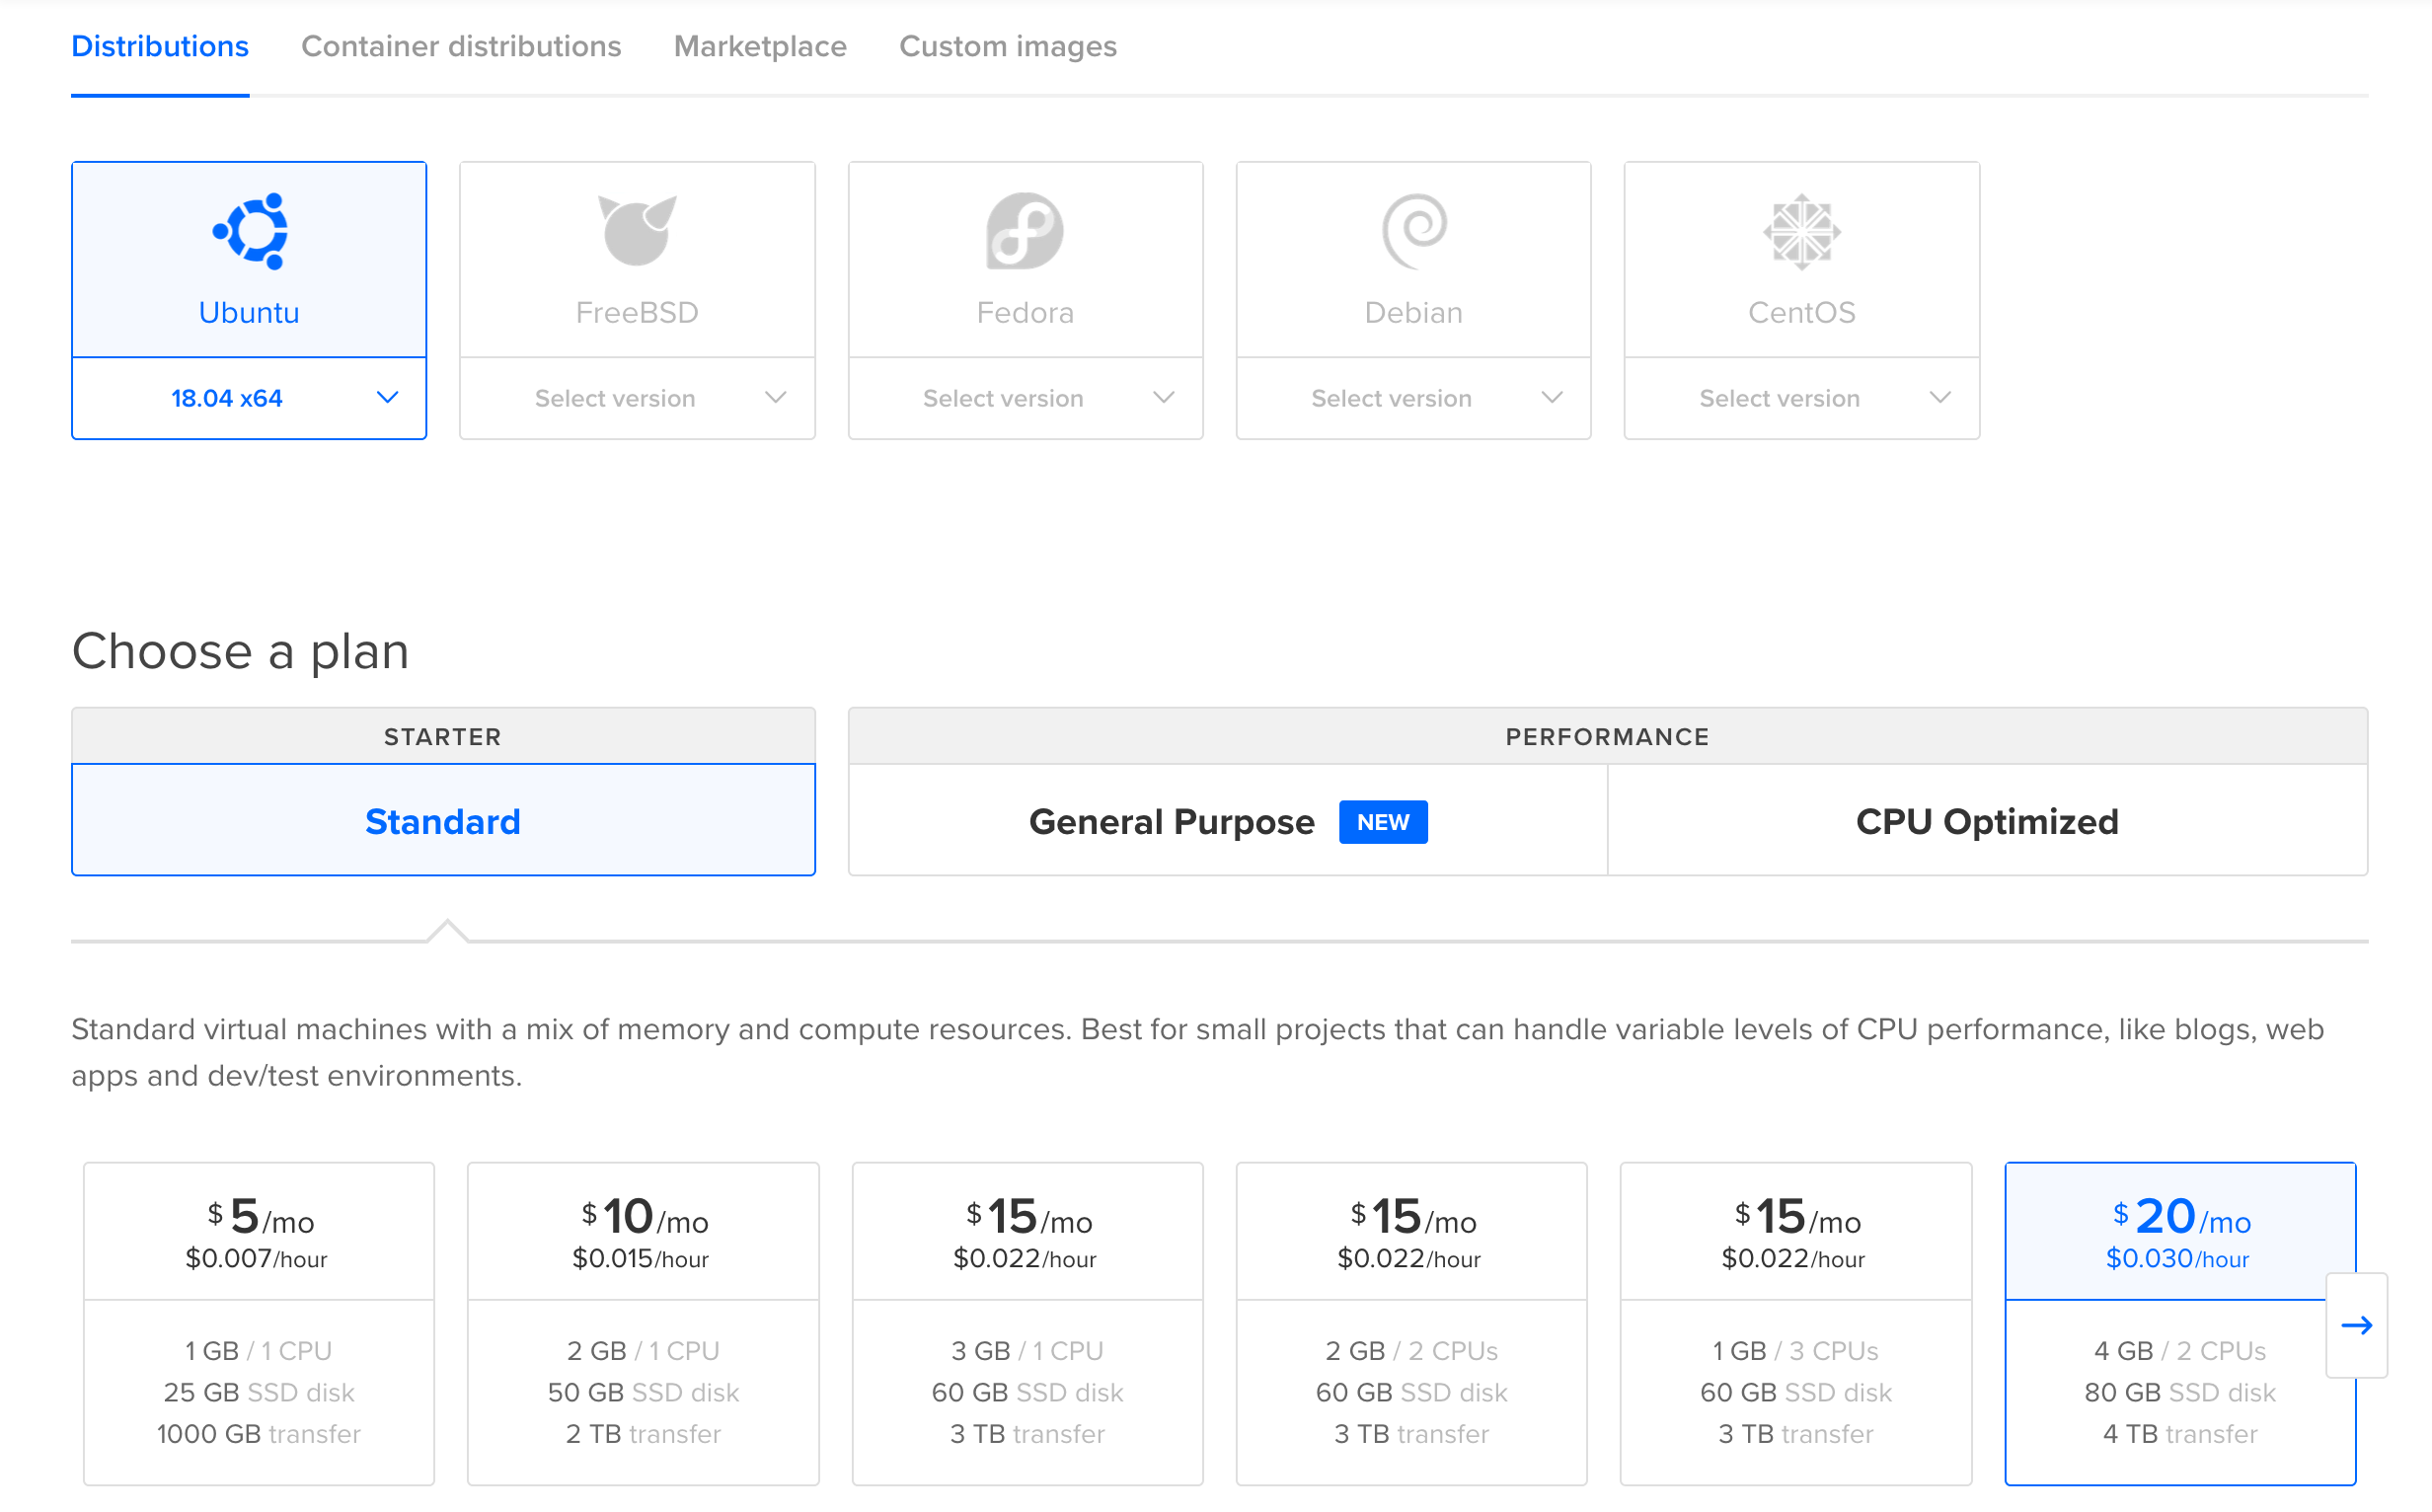
I’m using DigitalOcean to host my instance, if you’re signing up use this link to get $50 credits. To follow along, create a Ubuntu 18.04 droplet, I recommend giving it more RAM and CPU but for this tutorial I’ll just be using the $20/mo standard droplet.
Remember to add a SSH key, if you don’t have one read this.

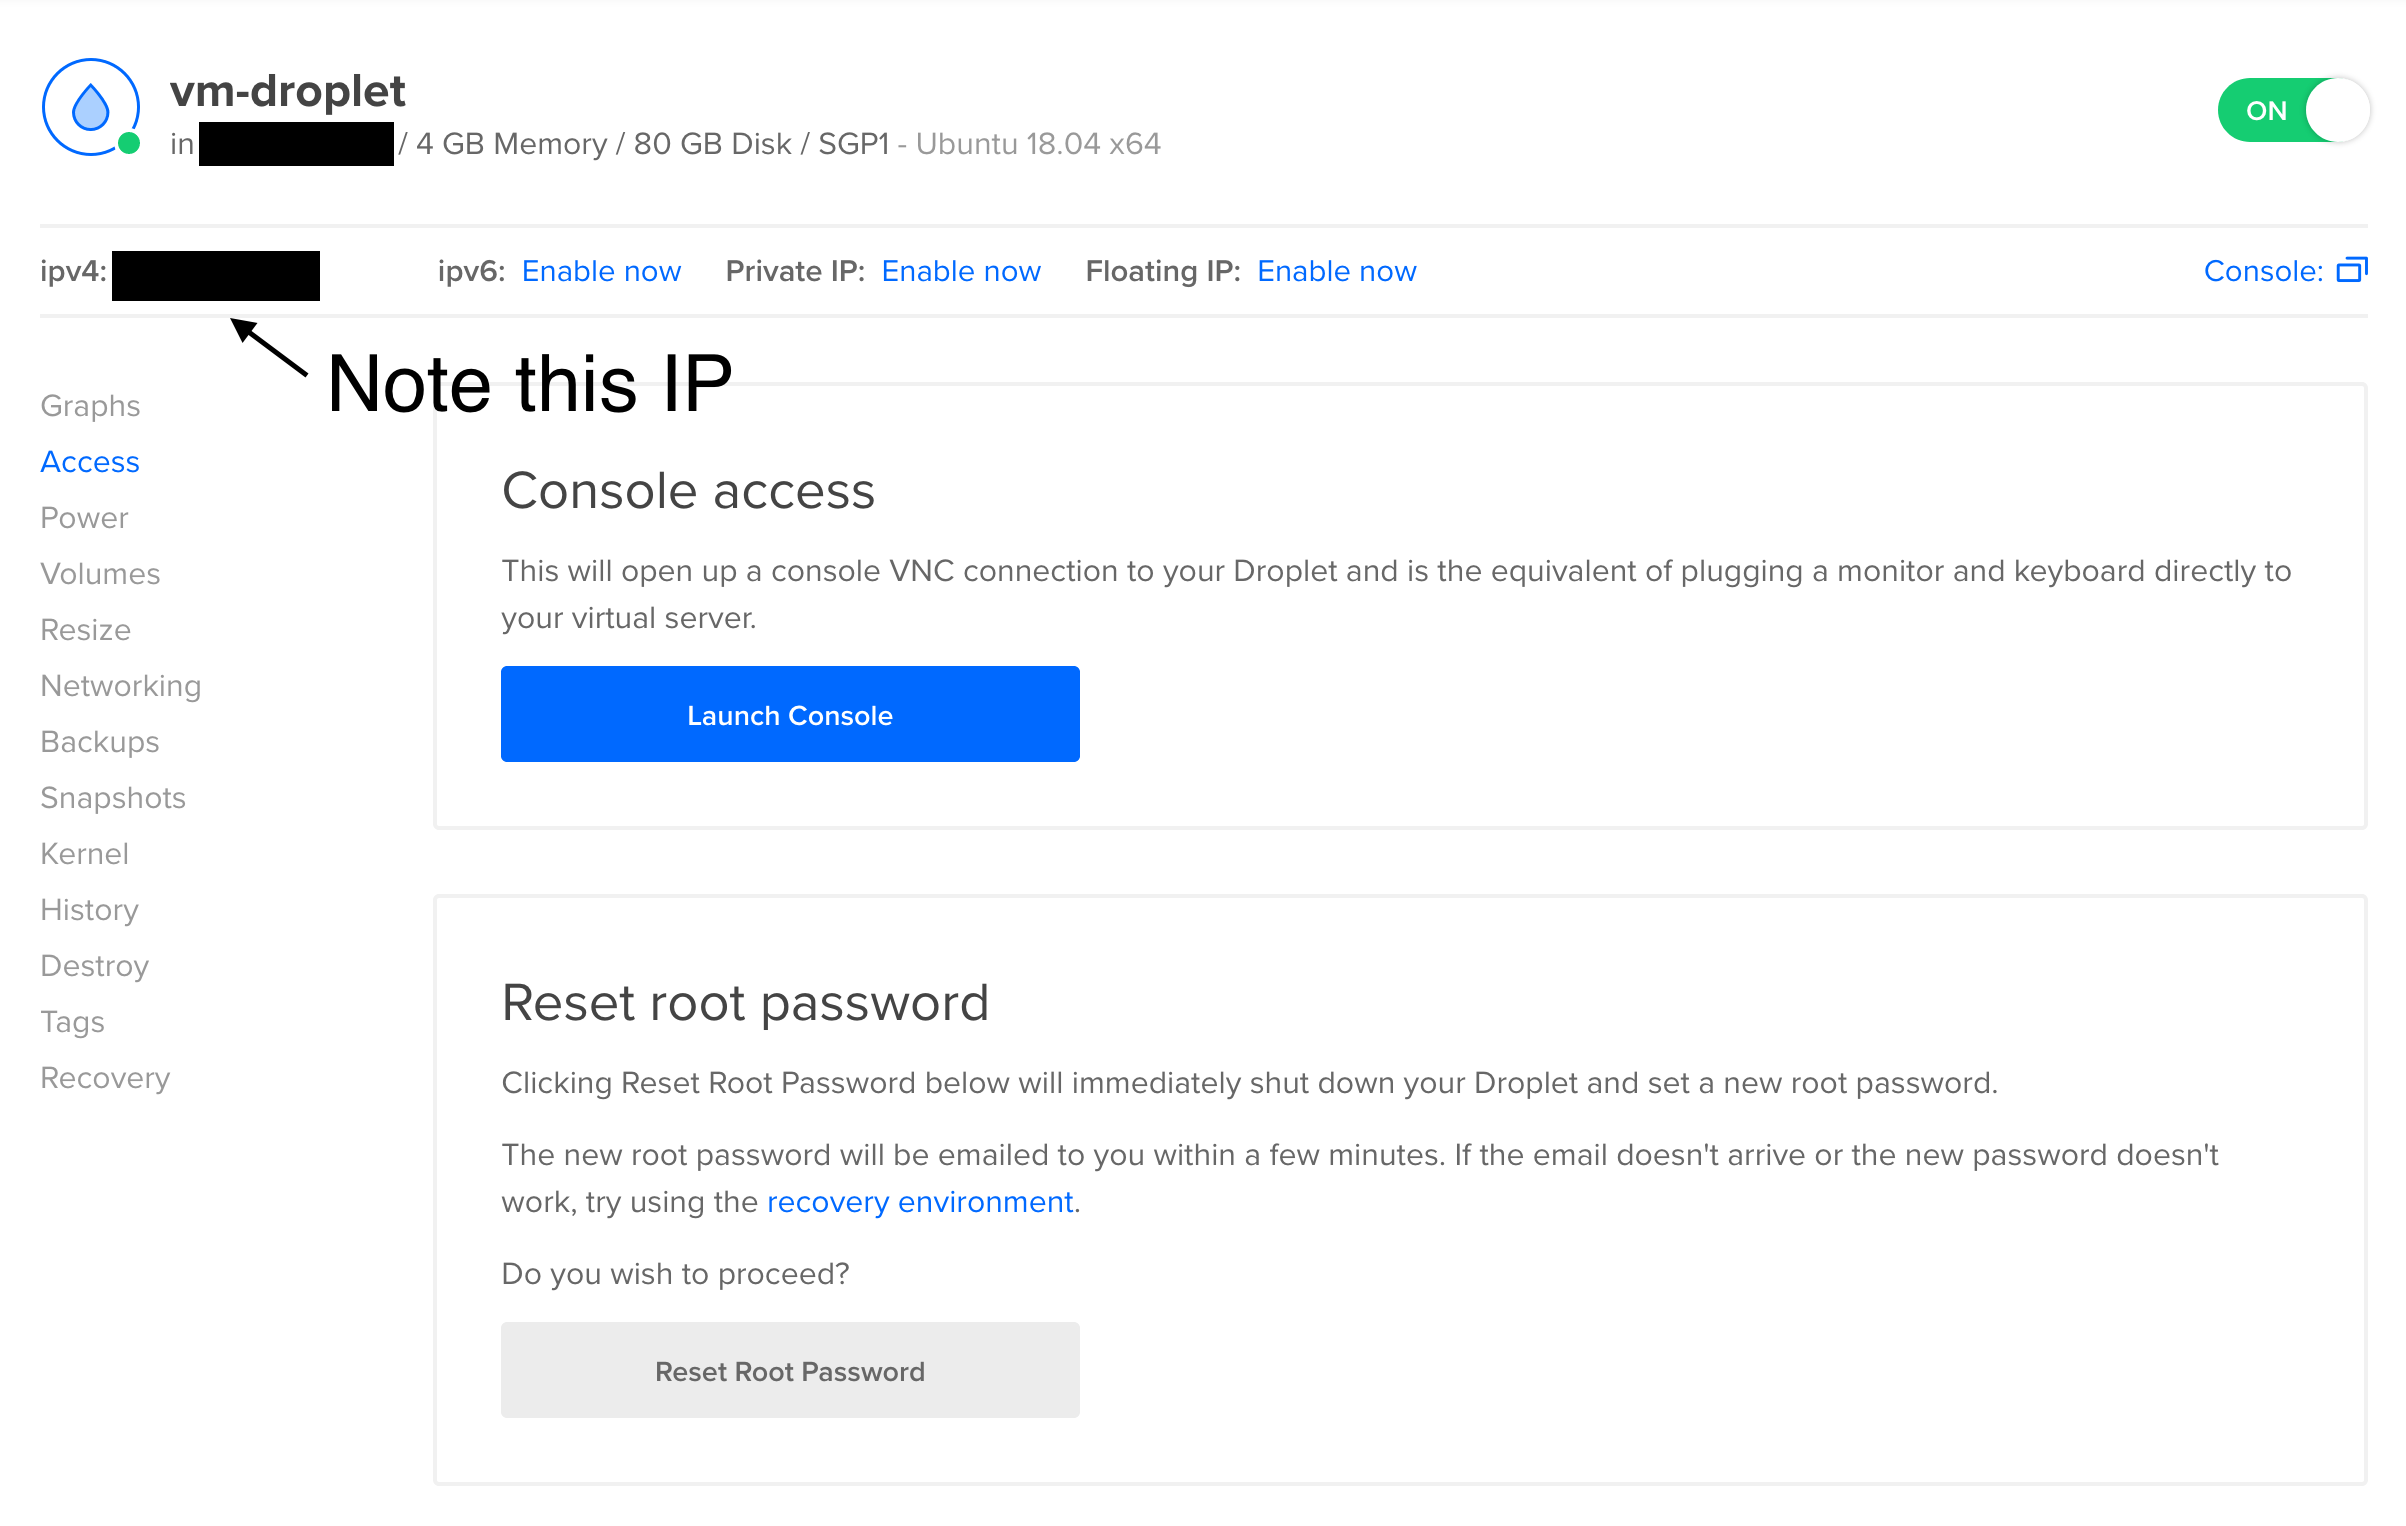
Creating the droplet should take a few minutes, once that’s done get the IP from the droplet’s page.
Connect to the droplet with SSH using the following command.
$ ssh -l root -i id_rsa <droplet ip>
You don’t have to specify the SSH key to use (-i) if the keys are in ~/.ssh.
Install VirtualBox
The distribution I’m on is Ubuntu 18.04 LTS, which didn’t include VirtualBox in the default repositories.
In order to install VirtualBox, the multiverse repository must be enabled on the system by running the following command in SSH.
$ sudo add-apt-repository multiverse && sudo apt-get update
This enables the multiverse repository and updates the package lists.
VirtualBox should be available as the virtualbox package which can be installed with:
$ sudo apt install virtualbox
Don’t forget to add the current user to the vboxusers group
Extension Pack
The VirtualBox Extension Pack can be installed with the virtualbox-ext-pack package.
This step is optional but can prove useful if you want extra features like remote display support (VRDP).
Note: VRDP is disabled by default and won’t be covered in this post.
$ sudo apt install virtualbox-ext-pack
Install VM
Now for the VM image.
Since this is a headless setup, a pre-made image with some services enabled (SSH) must be used. Here’s what can be done.
Download a pre-configured appliance image
This is the most common case for Boot2Root machines, most of them provide either an appliance file (.ova) or give you a storage image (.vdi, iso, vmdk, etc).
Importing an appliance (OVA)
To show this, I will install sokar, a VulnHub box.
Download the archive.
$ curl -O https://download.vulnhub.com/sokar/sokar.tar.gz
  % Total    % Received % Xferd  Average Speed   Time    Time     Time  Current
                                 Dload  Upload   Total   Spent    Left  Speed
100  350M  100  350M    0     0  6169k      0  0:00:58  0:00:58 --:--:-- 10.9M
Extract it for the appliance.
$ tar xzvf sokar.tar.gz
sokar/
sokar/readme.rtf
sokar/sokar.ova    <---
Using vboxmanage we can now import this appliance.
$ vboxmanage import sokar/sokar.ova
0%...10%...20%...30%...40%...50%...60%...70%...80%...90%...100%
Interpreting /home/nankeen/Downloads/sokar/sokar.ova...
OK.
Disks:
  vmdisk1	1610612736	-1	http://www.vmware.com/interfaces/specifications/vmdk.html#streamOptimized	sokar-disk1.vmdk	-1	-1
  vmdisk2	134217728	-1	http://www.vmware.com/interfaces/specifications/vmdk.html#streamOptimized	sokar-disk2.vmdk	-1	-1

Virtual system 0:
 0: Suggested OS type: "RedHat_64"
    (change with "--vsys 0 --ostype <type>"; use "list ostypes" to list all possible values)
 1: Suggested VM name "Sokar"
    (change with "--vsys 0 --vmname <name>")
 2: Vendor (ignored): Rasta Mouse
 3: VendorUrl (ignored): https://rasta-mouse.github.io
 4: Number of CPUs: 1
    (change with "--vsys 0 --cpus <n>")
 5: Guest memory: 256 MB
    (change with "--vsys 0 --memory <MB>")
 6: USB controller
    (disable with "--vsys 0 --unit 6 --ignore")
 7: Network adapter: orig HostOnly, config 3, extra slot=0;type=HostOnly
 8: SATA controller, type AHCI
    (disable with "--vsys 0 --unit 8 --ignore")
 9: Hard disk image: source image=sokar-disk1.vmdk, target path=/home/nankeen/VirtualBox VMs/Sokar/sokar-disk1.vmdk, controller=8;channel=0
    (change target path with "--vsys 0 --unit 9 --disk path";
    disable with "--vsys 0 --unit 9 --ignore")
10: Hard disk image: source image=sokar-disk2.vmdk, target path=/home/nankeen/VirtualBox VMs/Sokar/sokar-disk2.vmdk, controller=8;channel=1
    (change target path with "--vsys 0 --unit 10 --disk path";
    disable with "--vsys 0 --unit 10 --ignore")
0%...10%...20%...30%...40%...50%...60%...70%...80%...90%...100%
Successfully imported the appliance.
We can verify by issuing vboxmanage list vms which should show something like:
"Sokar" {f3252e26-b7e3-4f63-9892-05a8f5466759}
Importing a disk image
In some cases, as with Protostar, a disk image is given instead.
Download the .iso image using curl or wget.
One way to import this is to create a VM, and attach the image as a storage. So let’s create a virtual machine by issuing:
$ vboxmanage createvm --name Protostar --ostype Debian --register
Virtual machine 'Protostar' is created and registered.
UUID: 13f72e58-9d50-4060-87a0-e72284953050
Settings file: '/home/nankeen/VirtualBox VMs/Protostar/Protostar.vbox'
--ostype is optional, but it selects sensible defaults for the VM. To get a complete list, use the following command:
$ vboxmanage list ostypes
Check the VM info to see if there’s enough memory, CPU, etc.
$ vboxmanage showvminfo
To allocate memory, execute the following command:
vboxmanage modifyvm Protostar --memory 512
So close, before the ISO can be attached, a IDE controller is needed. Let’s add one by executing:
$ vboxmanage storagectl Protostar --name "IDE Controller" --add ide --controller PIIX4
Finally, attach the ISO image.
$ vboxmanage storageattach Protostar --storagectl "IDE Controller" --port 0 --device 0 --type dvddrive --medium /home/nankeen/Downloads/exploit-exercises-protostar-2.iso
Local install, remote run
Not every distribution will have an appliance image, and sometimes you need to build from a base image. A way around this is to create and export an appliance locally, which the remote instance can import. This would be viable if you don’t mind running the VM for just the install.
Networking
I like to attach a host-only adapter to isolate the VMs. First, create and configure the host-only interface.
$ vboxmanage hostonlyif create
0%...10%...20%...30%...40%...50%...60%...70%...80%...90%...100%
Interface 'vboxnet0' was successfully created
$ vboxmanage hostonlyif ipconfig vboxnet0 --ij 192.168.56.1
Then the VM must be modified to use the newly created interface.
$ vboxmanage modifyvm Protostar --hostonlyadapter1 vboxnet0
$ vboxmanage modifyvm Protostar --nic1 hostonly
Running headless
Let’s finally start the VM and see if we can SSH into it.
$ vboxmanage startvm Protostar --type headless
Waiting for VM "Protostar" to power on...
VM "Protostar" has been successfully started.
If you don’t want to detach after start use this instead:
$ vboxheadless --startvm Protostar
A copyright message should appear, if you’re dropped back into a shell then something went wrong.
Look for a host by pinging, netdiscover or use nmap.
$ ping 192.168.56.101
PING 192.168.56.101 (192.168.56.101) 56(84) bytes of data.
64 bytes from 192.168.56.101: icmp_seq=1 ttl=64 time=2.14 ms
64 bytes from 192.168.56.101: icmp_seq=2 ttl=64 time=2.28 ms
64 bytes from 192.168.56.101: icmp_seq=3 ttl=64 time=2.41 ms

--- 192.168.56.101 ping statistics ---
3 packets transmitted, 3 received, 0% packet loss, time 2003ms
rtt min/avg/max/mdev = 2.141/2.278/2.412/0.110 ms
Now I can SSH into the box!
$ ssh -l user 192.168.56.101
The authenticity of host '192.168.56.101 (192.168.56.101)' can't be established.
RSA key fingerprint is SHA256:aS6DhLbHGuBB8ocjfmvISjYKHVVVt0d28pBgol8SVEk.
Are you sure you want to continue connecting (yes/no)? yes
Warning: Permanently added '192.168.56.101' (RSA) to the list of known hosts.


    PPPP  RRRR   OOO  TTTTT  OOO   SSSS TTTTT   A   RRRR
    P   P R   R O   O   T   O   O S       T    A A  R   R
    PPPP  RRRR  O   O   T   O   O  SSS    T   AAAAA RRRR
    P     R  R  O   O   T   O   O     S   T   A   A R  R
    P     R   R  OOO    T    OOO  SSSS    T   A   A R   R

          http://exploit-exercises.com/protostar

Welcome to Protostar. To log in, you may use the user / user account.
When you need to use the root account, you can login as root / godmode.

For level descriptions / further help, please see the above url.

user@192.168.56.101's password:
Linux (none) 2.6.32-5-686 #1 SMP Mon Oct 3 04:15:24 UTC 2011 i686

The programs included with the Debian GNU/Linux system are free software;
the exact distribution terms for each program are described in the
individual files in /usr/share/doc/*/copyright.

Debian GNU/Linux comes with ABSOLUTELY NO WARRANTY, to the extent
permitted by applicable law.
$
Stop the VM using:
$ vboxmanage controlvm Protostar poweroff
0%...10%...20%...30%...40%...50%...60%...70%...80%...90%...100%
Side note on SSH tunnel
If you don’t want to do everything through SSH, a local forward is a convenient way to access the VM.
Going forward
Setting up VMs like this is quite tedious, so I prefer using Docker whenever possible. Remember that you will still be charged when the droplet is off. One way to save some money is to take a snapshot and destroy the droplet when not in use. You’ll still be charged for snapshot storage but I think that’s pretty reasonable.
Also, there are cases where DHCP isn’t configured correctly, or you have to attach to the VM directly for other reasons. This is where remote display would come in handy. Maybe I’ll cover this in another post, in the mean time, feel free to look into the documentation.